


We’re Obsessing Over: The Surprise That Goes With DIY Ice-dyeing
Days before our Garage Young Talents 2019 party, I was faced with a dilemma of not having anything to wear. The theme was summer tie-dye, and to be honest, I have never been a fan of this design so I didn’t have a single tie-dyed piece in my closet. Five colors bursting in hippie patterns on my clothes? Hard pass, my friend.
The multi-color hippie print is famously credited to the ‘70s era, but did you know that tie-dyeing dates back to the ‘60s? Singers Jimi Hendrix and Janis Joplin were the frontrunners of the trend, and looking back at the pieces they wore, I realized that if I were ever to jump fully on the tie-dye bandwagon, that time period would be my guide. The designs then were more intricate and have more forgiving color combinations.

With its comeback in the past three seasons, versions of this motif emerged. We saw the beautiful bleached effect featured at Cerruti 1881’s spring/summer ’19 collection, and the minimalist tie-dying over white was enough to make a statement at Louis Vuitton spring/season 2019.
The trend has now trickled down to retail stores, but none of what’s readily available had the design I like: The water splash effect of dyed fabric, like those seen on Christian Dada’s scarves-turned-ponchos. That, plus the urge to remain true to the philosophy behind tie-dying—to express my creativity and produce a unique design that is mine and mine alone—made me decide to DIY it.
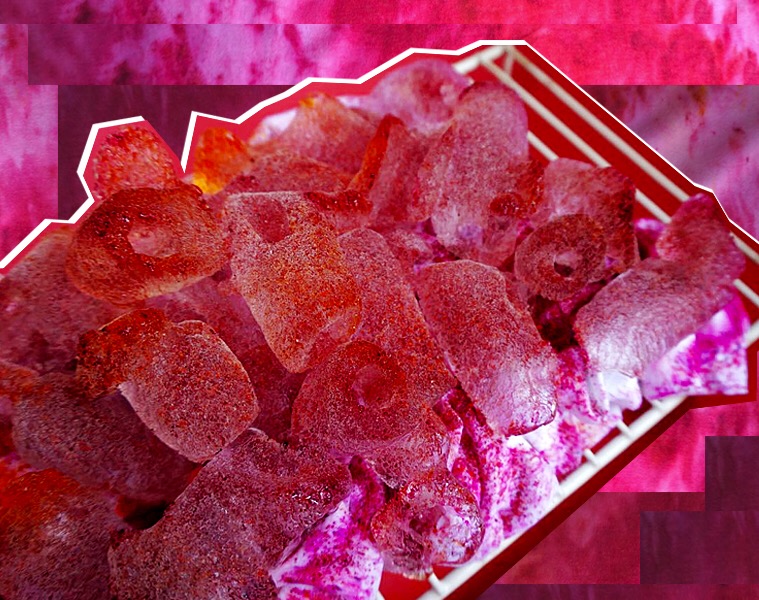
To achieve the splatter of paint that webs throughout the garment like a wrinkle or a ripple, you should skip the bands and the tying and go for ice-dyeing instead. In ice-dyeing, you allow how the dye slowly dissolves in melted ice to create the design for you. With no idea of how it will turn out, you’ll be giddy with anticipation right before you spread open the fabric.
For what I wore to the Garage Young Talents 2019 party, I used some inexpensive dye available in the good ol’ wet market. I had ordered imported dye but didn’t receive it on time, so I resorted to a local brand. I was hesitant at first, because imported dyes are usually used in ice-dyeing due to the stronger hues they yield, whereas local dyes are usually diluted in water and have a reputation of fading quickly. But let me assure you that yes, locally made works! The colors might fade quicker, sure, but you will still get the effect you’re going for, at the very least.

After trying out ice-dyeing once, I was hooked. I dyed one of my old t-shirts to share with you the process (and also because I have a lot of dye left LOL).
1.Start off with soaking your fabric in water mixed with soda ash for 15 minutes. Soda ash or sodium carbonate is a compound that helps the fabric absorb the dye and retain the color permanently. There are imported dye brands that don’t require soda ash before application, but if you’re going local, I suggest you use some. You can buy soda ash from online retailers, or if you really want it to be DIY all the way, you can also turn baking soda to soda ash at home.

2. Wring off water from the fabric and let it dry on top of a drying rack played atop a small tub or basin. Arrange the fabric by twisting or crumpling it, though if you choose to do the former, make sure to keep the twists loose to give room for the dye to expand.

3. Place ice on top of the fabric. Try to cover as much cloth as possible, although leaving the edges uncovered is okay, too, as the melting ice and dye can reach those parts as well.


4. Sprinkle the dye on top of the ice. If you’re using two or more colors, you can randomly sprinkle the colors or do it half-half. What I like doing is using one color as the main hue, and sprinkling another one as hints or accents in random places. Once done, let the fabric, ice, and dye rest. Once the ice has fully melted, wait for six hours before washing the fabric; rinse it until the water runs clean then hang the fabric to dry.


What I like about how the patterns turn out with ice-dyeing is that you really can’t classify them as “for summer only.” If you have excess cloths lying around, you can make a throw out of them with a little creative dyeing. If you have a plain button-down shirt or linen bag you haven’t used in a while, give it a print update. As for me, BRB, I’m off to dye my blazer.